

For a resin flower sphere, choose a small, fully dried flower with a shape and colour you want to hold in view. Fill the spherical mould to 40-50% before placing the bloom, then add the remaining material gently so the flower stays where you’ve arranged it.
A flower is more than its colour. It holds the hush of a garden, the warmth of a season and the briefness of a moment. Choosing one to preserve means noticing its form as well as its beauty: how its petals open, how its silhouette appears from every side, and what memory it brings close.
This guide explains how to choose flowers and position them in a spherical mould. You’ll learn how drying affects their appearance, how to arrange a bloom so it can be seen clearly, and why patience matters to the finished botanical sphere. Careful preparation keeps nature’s quiet artistry at the centre.
Key Takeaways
- Choose a flower for its shape as well as its colour, and consider how its form will appear from every side.
- Place the bloom after the mould is partly filled to help position it within the sphere.
- Explore drying methods such as hanging, pressing or using a drying medium to prepare flowers for preservation.
- Mix slowly and allow the mixture to rest briefly to help reduce trapped bubbles.
- Weigh the materials, time and finish involved when deciding whether to make a botanical sphere or choose a finished piece.
Embedding flowers in spherical molds
A sphere has no single front: its bloom can be seen from every direction. Choose its resting place with care, and consider how its outline will look through the curved surface.
- Set the spherical mould on a steady, level surface. Before adding anything, turn the dry flower slowly and notice its most expressive side. A rose may reveal its layered centre from one angle, while a small wildflower may show its delicate outline best from another. Let that view guide your arrangement.
- Prepare the clear casting material according to the manufacturer’s instructions. Keep the flower nearby and decide how you’ll hold it before you begin. A simple plan avoids searching for tools mid-pour, when your attention belongs on the bloom and its position in the sphere.
- Pour until the mould is 40-50% full, then lower the flower gently. This first layer gives you room to settle the bloom before adding more. Use a clean tool to guide its position, rather than pressing delicate petals with your fingers.
- Look through the curved mould from several sides. A flower placed too close to the edge may appear flattened against it; one turned towards the centre can reveal more of its shape. Move it gently until the petals and stem form a composition you’re happy to see from different viewpoints.
-
Place flowers in spherical moulds
Hold the chosen position as you slowly add the remaining clear material. Direct the flow away from the most delicate petals to avoid disturbing them. Pause to inspect the bloom from the front, side and above. Small adjustments now can change the finished botanical orb’s quiet balance.
- Keep the flower’s scale in mind as the mould fills. A large bloom can dominate the sphere, while a smaller one leaves more open space around it. Neither arrangement is better: choose whether you want the petals to lead the eye or appear suspended within a wider, clear field.
-
Reduce bubbles and prevent yellowing
Stir gently and avoid hurried movements that introduce air. Follow the material’s instructions, and keep harsh chemicals away from the finished surface because they can discolour it. Before leaving the mould undisturbed, look for bubbles near the petals and gently adjust their position with a clean tool.
- Leave the sphere still while it sets. Movement can disturb the flower’s carefully chosen orientation. Once complete, its rounded surface invites the eye to travel around the bloom, revealing changing details with every turn. That shift in perspective is part of a botanical sphere’s quiet appeal.
How do you dry and preserve flowers for a botanical sphere?
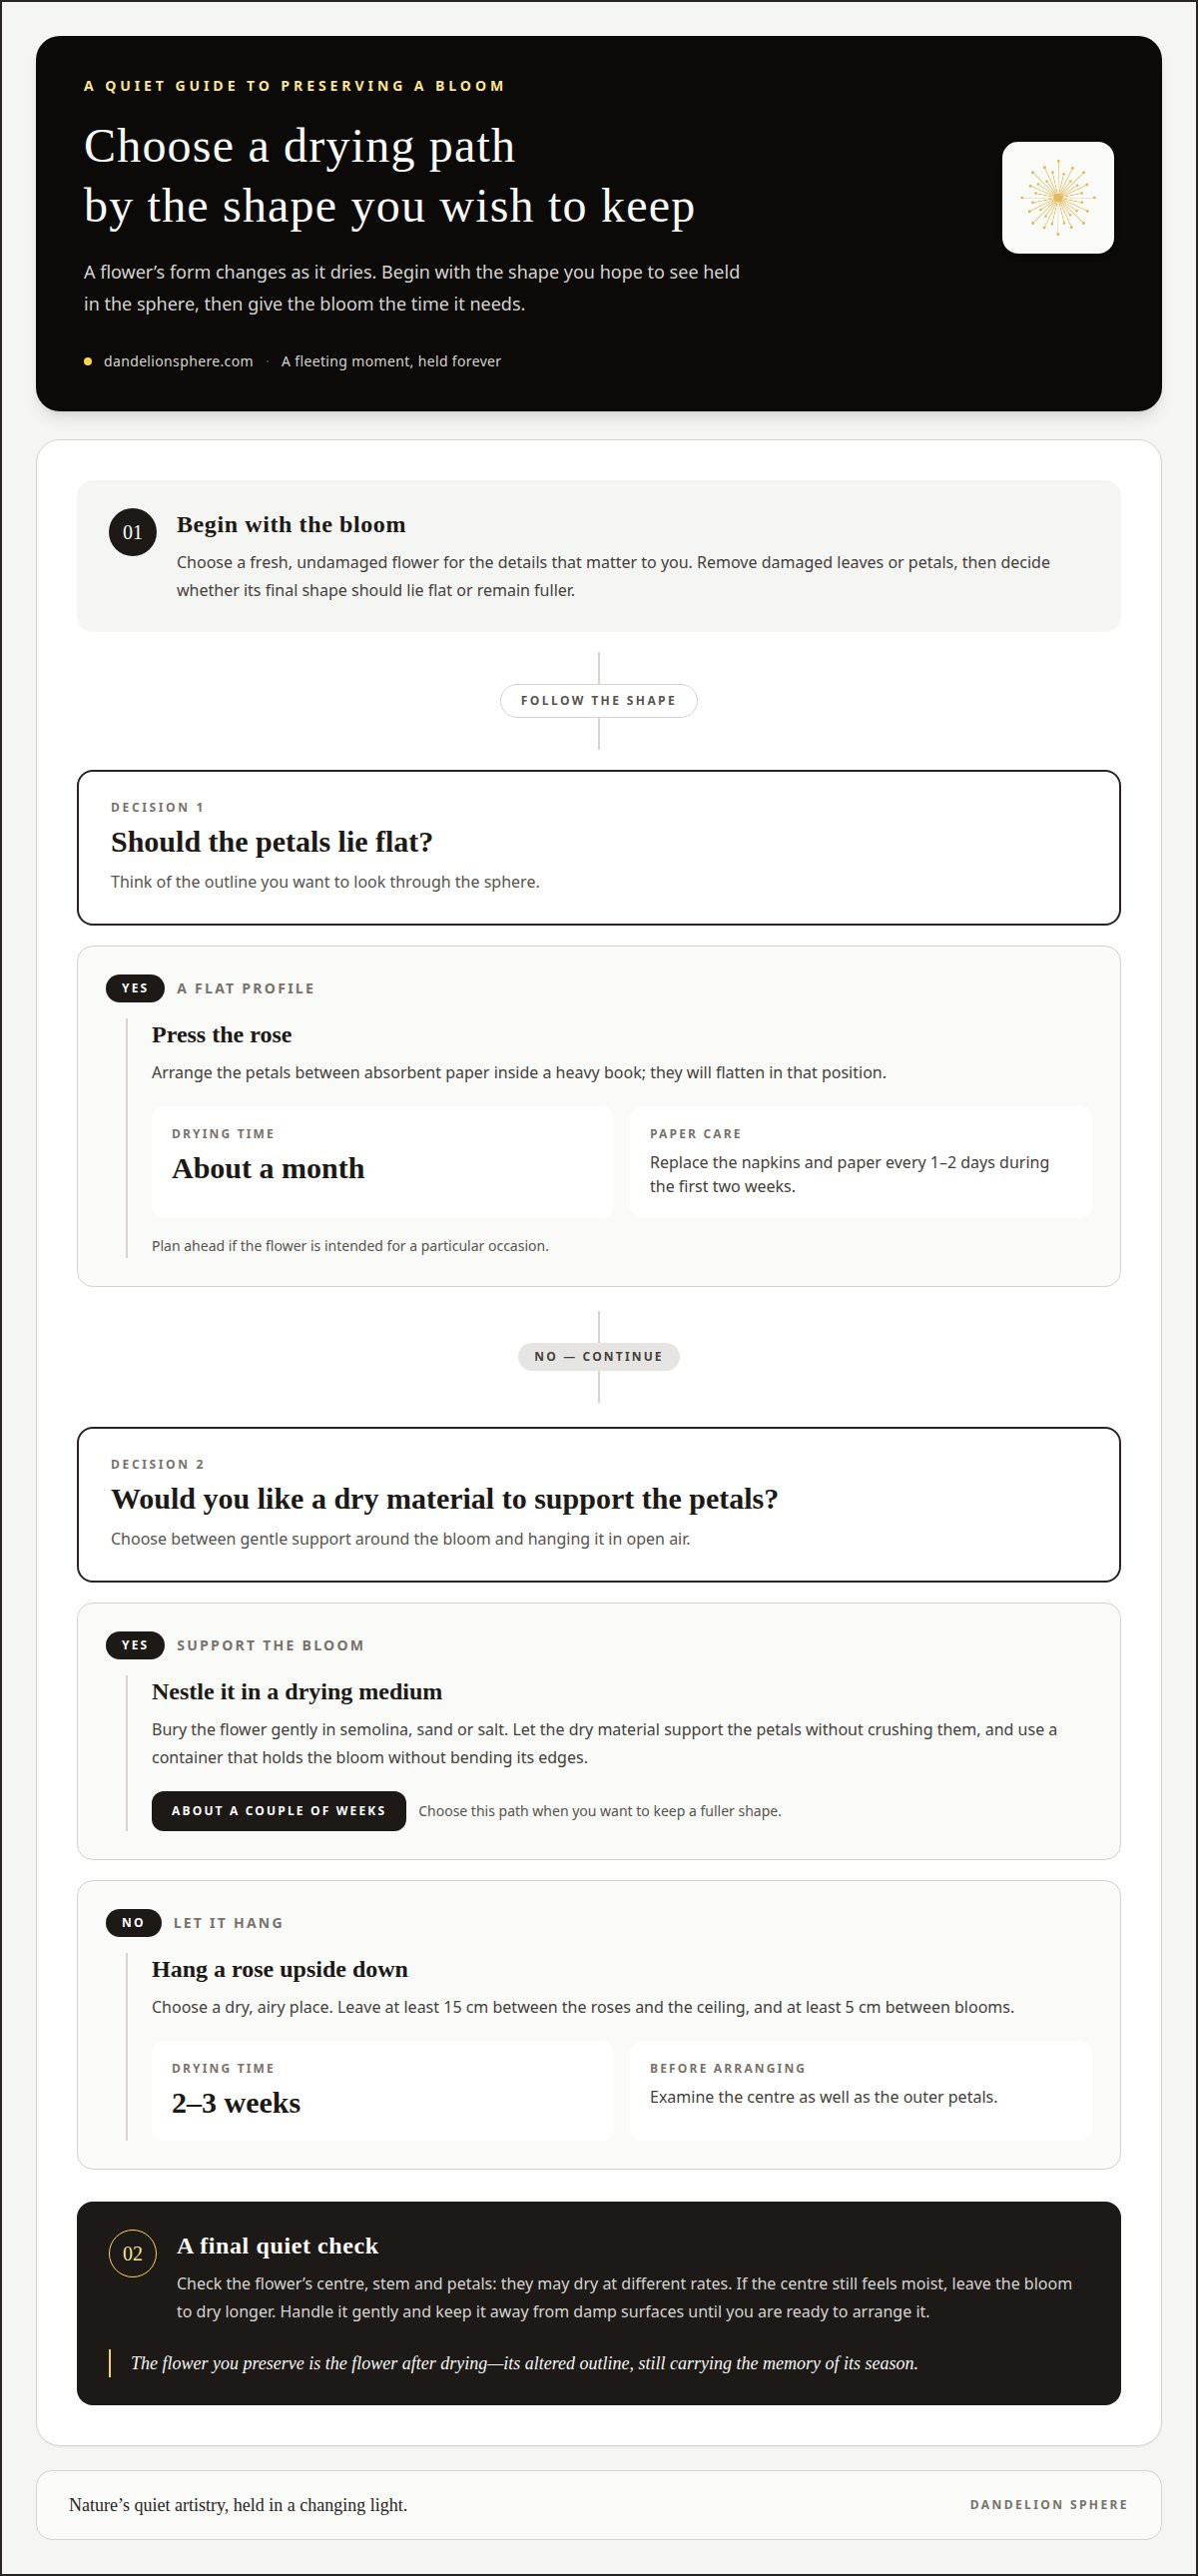
Drying changes a flower’s shape as well as its feel. Choose a method that suits the form you want to preserve, then give the bloom time to dry thoroughly.
- Select a fresh, undamaged flower and decide which details matter most. A rose offers layered petals, while a smaller wildflower has a fine silhouette. Remove damaged leaves and petals before drying. Keep the stem if it belongs in the composition, or trim it if you prefer the bloom alone.
- Hang roses upside down in a dry, airy place. Leave at least 15 cm between the roses and the ceiling, with at least 5 cm between blooms. This gives each flower space as it dries. Allow 2-3 weeks, then examine the centre as well as the outer petals.
- Press a rose between absorbent paper inside a heavy book. Arrange its petals first, because they’ll flatten in that position. Replace the napkins and paper every 1-2 days during the first two weeks. A pressed rose takes about a month to dry, so plan ahead for a particular occasion.
- For a fuller shape, bury the flower in semolina, sand or salt. Cover it gently, letting the dry material support the petals without crushing them. Flowers prepared this way take about a couple of weeks to dry. Choose a container that holds the bloom without bending its edges.
- Keep the drying method in mind when choosing the flower’s final position. A book-pressed rose lies flat, while a hung rose keeps a fuller outline. Compare the dried bloom with the form you imagined. Its appearance after drying, not its fresh shape, is what you’ll preserve.
- Check the centre, stem and petals before using the flower. These parts may dry at different rates, especially in a layered rose. Handle the bloom gently and check for any remaining dampness. If the centre still feels moist, leave it to dry longer rather than treating it as ready.
- Store the dry flower carefully until you’re ready to arrange it. Keep it away from damp surfaces and avoid pressing its fragile petals. If you’ve prepared several blooms, keep them separate and note each drying method. You can then choose the flower whose preserved shape best suits your composition.
What does it take to make or choose a botanical sphere?
- First decide whether you want the experience of making a sphere or the quiet pleasure of choosing a finished piece. Making one requires materials, preparation and a place to work. Choosing a completed sphere keeps the focus on its flower, form and the memory you hope it will hold.
- For a home project, list what you already have before gathering anything new. You may already own a suitable mould, mixing cup and clean tools. Mark each item as ready, needed or replaceable. This simple inventory shows what the project requires.
- Consider the mould’s size and shape before selecting materials. A larger form needs more casting material than a smaller one, and its curved surface also changes how the flower appears. Let the intended bloom and final composition guide your choice of mould.
- Think about the flower’s meaning as part of the project. A garden bloom carries its own memory, while a flower chosen for a particular colour or shape becomes part of a deliberate composition. The right choice depends on the meaning and appearance you want, not simply on the materials.
- Allow for the time and attention the process requires. You’ll need to prepare the flower, arrange it and let the finished form set. If you’re making a sphere for a particular occasion, such as a birthday or a new home, plan around these stages rather than leaving the work until the last moment.
- For a finished botanical piece, consider the details that matter most to you. Look at the flower’s natural shape, its position and how the transparent form frames it. A sphere chosen for a meaningful memory may feel more fitting than one selected only for its size.
- Compare the two options by writing down what each involves. For making, note the tools and materials you’d need. For a finished piece, consider its listed details and the form that suits your space or purpose. Keep the comparison grounded in your priorities.
- Make your decision by weighing effort against intention. Creating a botanical sphere gives you the experience of shaping a composition yourself. Choosing one that’s already complete lets you welcome a preserved flower without preparing it. Either way, its meaning begins with the moment you want to keep close.
Removing bubbles and yellowing in resin flower spheres
A clear surface keeps each petal visible. Careful mixing and gentle cleaning help preserve that view.
- Read the product instructions before measuring the two components. Follow the stated proportions, since different mixtures can require different ratios. Set out the cup and stirring tool before you begin. This preparation helps you mix steadily without pausing to find equipment.
- Stir the mixture for 8-10 minutes, scraping the cup’s sides and base as you work. Keep the movement slow and even. Vigorous stirring can draw air into the mixture, leaving bubbles that may become visible beside a flower’s petals or stem.
- Inspect the mixture after stirring. Look for small air pockets clinging to the sides of the cup, then gently scrape them back into the liquid. Avoid whipping the mixture or repeatedly lifting the tool. Quick movements can introduce more air into the material.
- Leave the mixed material in a warm place for 5-7 minutes before pouring. This pause gives air bubbles time to rise towards the surface. Keep the container still during those minutes. Avoid stirring again just before pouring, since fresh movement may trap more air.
- Pour slowly into the spherical mould, directing the stream towards its inside wall. A narrow, steady flow disturbs the mixture less than a sudden pour. Watch for bubbles gathering around the flower. Use a clean tool to gently move any visible bubble away from a petal.
- Examine the mould from several sides before leaving it to set. A bubble near a flower’s centre can interrupt its outline, while one at the edge may be less noticeable. Make any small adjustment with a clean tool, then stop moving the mould.
- Protect the finished sphere from harsh chemicals, which can discolour the material. Don’t use them to clean its surface. Handle it gently and avoid abrasive materials, which can scratch the surface and cloud the clear view of the bloom.
- Keep care simple once the sphere has set. If it needs cleaning, use soap and water with a soft cloth. Avoid abrasive towels or rags, which can scratch the surface. Gentle cleaning helps preserve the clear view of the flower’s fine details.
Are resin flower spheres safe to make, and what protective equipment is needed
- Read the product label and safety data sheet before opening either component. Check the stated handling, ventilation, storage and first-aid instructions. Products differ, so follow the directions supplied for your chosen material rather than assuming every mixture needs the same precautions.
- Prepare a clear, well-ventilated workspace before measuring. Keep it separate from food preparation, and move food, drinks and utensils away. Arrange your mould, mixing cup and tools within reach so you don’t need to search through cupboards with gloves on.
- Wear protective gloves suitable for the material, as directed by its label. Check that they cover your hands fully and remain intact during mixing and pouring. Replace any torn or contaminated pair, and avoid touching door handles, phones or shared objects with soiled gloves.
- Use eye protection while measuring and pouring. A cup may tip or a stirrer may lift unexpectedly, causing a splash. Keep the container near the work surface, pour slowly and follow the product instructions if material reaches your eyes.
- Choose clothing that covers exposed skin, and protect the table with a disposable covering. Keep sleeves clear of the mixture. Set used stirrers, cups and gloves aside in a designated place, away from clean tools and household items.
- Keep children and pets away from the workspace during preparation and setting. Store both components in their original, labelled containers, closed and out of reach. Don’t transfer them into food jars or bottles, where someone could mistake their contents.
- Measure and mix only as the manufacturer directs. Avoid direct contact with either component, and don’t use bare fingers to reposition a flower. Use a clean tool instead. Keep the lid and safety information nearby in case you need to consult them.
- Deal with spills according to the product’s clean-up instructions. Don’t wipe an unknown spill with bare hands or mix it with household cleaners. Keep others clear until the area is clean, and follow the stated disposal guidance for used materials.
- After pouring, leave the mould in a protected place where it won’t be disturbed. Keep the area ventilated for the period specified in the product directions. Don’t handle the sphere or remove protective equipment until the instructions allow it.
- When you’ve finished, follow the label’s directions for removing gloves and cleaning up. Wash your hands after handling the materials, even if the gloves remained intact. Put tools away separately from kitchen equipment, and store remaining components in their original containers.
Taraxacum Orbis - Dandelion Sphere: Dandelion Spheres
Dandelion Sphere, a concept by Tertius Collection, offers finished Dandelion Spheres for anyone drawn to a botanical keepsake. If you’ve enjoyed learning how flowers are prepared and arranged but would rather leave the making aside, a completed sphere offers another way to hold a fleeting moment close.
Dandelion Spheres and Dandelion Cubes bring nature’s quiet forms into view. Each piece holds a real dandelion seed head, carefully preserved in a clear solid form, with its seeds fixed in place. Choose a finished object when you want a botanical keepsake rather than the materials and time involved in making one yourself.
To explore the collection, visit the shop, or contact Taraxacum Orbis - Dandelion Sphere.
Let a fleeting moment find its place
Choosing a flower is also choosing what you wish to remember. The curve of a petal, a garden’s first bloom or a small wish released into the breeze can carry meaning beyond its brief season. Making a resin flower sphere can begin as a quiet experiment and become a reminder of the moment that first drew your attention.
If you’d rather bring a finished botanical piece into your life, Taraxacum Orbis - Dandelion Sphere offers Dandelion Spheres, Botanical Art Objects and Luxury Gift Objects. Each offers another way to keep nature’s quiet artistry close. A finished resin flower sphere may suit you when you want to cherish a fleeting moment without making one yourself.
Let your next step be guided by the memory you want to hold. Explore the botanical collection, and find the form that speaks to you. There is beauty in making something yourself, and in recognising a moment already held with care.
Frequently Asked Questions
What is a resin flower sphere?
It’s a clear, rounded form with a flower preserved within it. A resin flower sphere can hold a bloom as a focal point, viewed through its curved surface. For example, a small rose can show its layered petals from different angles. Dandelion Sphere’s botanical pieces instead preserve real dandelion seed heads in a clear solid medium, with the seeds held in place.
How do you make one step by step?
Begin with a completely dry flower and a clean spherical mould. Mix the material according to its maker’s instructions, then pour some into the mould. Position the bloom with a clean tool and add the remaining mixture slowly. For a resin flower sphere, consider the flower’s shape from several viewing angles before leaving the mould undisturbed to set.
Can fresh flowers be used in a resin sphere, or must they be dried first?
Dry the flower first. Fresh petals and stems contain moisture, which can affect the finished piece’s clarity and appearance. Check the centre as well as the outer petals: a rose may feel dry at the edges while remaining damp inside. Once fully dry, its shape is ready to be considered for a resin flower sphere.
How much does it cost to make or buy a resin flower sphere?
What resin, mold, and tools are best for making flower spheres?
Use a spherical mould and prepare the clear casting material according to its manufacturer’s instructions. Have a mixing cup and clean tools ready to stir the mixture and gently position the flower.
Disclaimer
The content on this website is provided for inspiration and informational purposes only. Articles reflect the philosophy and storytelling of Dandelion Sphere and are not intended as professional advice. While every effort is made to ensure accuracy, no guarantees are given regarding completeness or current applicability.


